пятница, 27 мая 2016 г.

Installing patches on an ESXi 5.x/6.x host from the command line

To patch an ESXi 5.x/6.x host from the command line:

  1. Patches for VMware products can be obtained from the VMware patch portal. Select ESXi (Embedded and Installable) in the product dropdown and click Search.
  2. Click the Download link below the patch Release Name to download the patch to your system.
  3. Upload the patch to a datastore on your ESXi 5.x/6.x host using the Datastore Browser from vCenter Server or a direct connection to the ESXi 5.x/6.x host using the vSphere client.

    Note: VMware recommends creating a new directory on the datastore and uploading the patch file to this directory.
  4. Log in to the local Tech Support Mode console of the ESXi 5.x/6.x host. For more information, see Using Tech Support Mode in ESXi 4.1 and ESXi 5.x (1017910).
  5. Migrate or power off the virtual machines running on the host and put the host into maintenance mode. The host can be put into maintenance mode by running this command:

    # vim-cmd hostsvc/maintenance_mode_enter 
  6. Navigate to the directory on the datastore where the patch file was uploaded to and verify that the file exists by running these commands:

    # cd /vmfs/volumes/Datastore/DirectoryName
    # ls 


    Where Datastore is the datastore name where the patch file was uploaded to, and DirectoryName is the directory you created on the datastore.
  7. Install or update a patch on the host using these esxcli commands:

    Notes:

    • To install or update a .zip file, use the -d option. To install or update a .vib file use the -v option.
    • Using the update command is the recommended method for patch application. Using this command applies all of the newer contents in a patch, including all security fixes. Contents of the patch that are a lower revision than the existing packages on the system are not applied.
    • Using the install command overwrites the existing packages in the system with contents of the patch you are installing, including installing new packages and removing old packages. The install command may downgrade packages on the system and should be used with caution. If required, the install command can be used to downgrade a system (only for image profiles) when the --allow-downgrade flag is set.
    Caution: The install method has the possibility of overwriting existing drivers. If you are using third-party ESXi images, VMware recommends using the update method to prevent an unbootable state.
    To Install:

    • Using local setup:

      # esxcli software vib install -d "/vmfs/volumes/Datastore/DirectoryName/PatchName.zip

      Where PatchName.zip is the name of the patch file you uploaded to the datastore.

      Note: Alternatively, you can use the datastore's UUID instead of the DirectoryName .

      For example:

      # esxcli software vib install -d "/vmfs/volumes/datastore1/patch-directory/ESXi500-201111001.zip" 

      or

      # esxcli software vib install -d "/vmfs/volumes/a2bb3e7c-ca10571c-cec6-e5a60cc0e7d0/patch-directory/ESXi500-201111001.zip" 
    • Using http setup:

      # esxcli software vib install -v viburl 

      Where viburl is the URL to the http depot where VIB packages reside.

      For example:

      # esxcli software vib install -v https://hostupdate.vmware.com/software/VUM/PRODUCTION/main/esx/vmw/vib20/tools-light/VMware_locker_tools-light_5.0.0-0.7.515841.vib 
    To Update:

    • Using local setup:

      # esxcli software vib update -d "/vmfs/volumes/Datastore/DirectoryName/PatchName.zip"

      Where PatchName.zip is the name of the patch file you uploaded to the datastore.

      Note: Alternatively, you can use the datastore's UUID instead of the DirectoryName .

      For example:

      # esxcli software vib update -d "/vmfs/volumes/datastore1/patch-directory/ESXi500-201111001.zip" 

      or

      # esxcli software vib update -d "/vmfs/volumes/ a2bb3e7c-ca10571c-cec6-e5a60cc0e7d0/patch-directory/ESXi500-201111001.zip" 
    • Using http setup:

      # esxcli software vib update -v viburl 

      Where viburl is the URL to the http depot where VIB packages reside.

      For example:

      # esxcli software vib update -v https://hostupdate.vmware.com/software/VUM/PRODUCTION/main/esx/vmw/vib20/tools-light/VMware_locker_tools-light_5.0.0-0.7.515841.vib
  8. Verify that the VIBs are installed on your ESXi host:

    # esxcli software vib list 

    For example:

    # esxcli software vib list 

    Name              Version                     Vendor Acceptance Level Install Date
    ----------------- --------------------------- ------ ---------------- ------------
    ata-pata-amd      0.3.10-3vmw.500.0.0.469512  VMware VMwareCertified  2012-05-04
    ata-pata-atiixp   0.4.6-3vmw.500.0.0.469512   VMware VMwareCertified  2012-05-04
    ata-pata-cmd64x   0.2.5-3vmw.500.0.0.469512   VMware VMwareCertified  2012-05-04
    ata-pata-hpt3x2n  0.3.4-3vmw.500.0.0.469512   VMware VMwareCertified  2012-05-04 

  9. After the patch has been installed, reboot the ESX host:

    # reboot 
  10. After the host has finished booting, exit maintenance mode and power on the virtual machines:

    # vim-cmd hostsvc/maintenance_mode_exit

четверг, 26 мая 2016 г.

Установка Cisco UCS Plugin for Vmware WebClient и небольшие проблемки


The following Plugin for VMware vSphere Web Client is available for download from Cisco.com:

Cisco UCS Manager Plugin Release 1.2.2 for VMware vSphere Web Client:
Downloads:
Documentation Links:

После скачивания плагина и его успешной регистрации 

Мы не видим плагина в Web Client Vmware.
Problem:
Following installation, the UCS plugin for vCenter icon does not appear under the administration section of the Web Client as expected.  Though you may see the plugin registered from the java VI Client "Plugin Extension" wizard, it doesn't appear in the Web Client.

Background:
The plugin registration (installation) process only registers the "details" of the plugin including the URL where it's located.  vCenter doesn’t download the plugin at this stage. It just registers the details of the plugin. When the call to vCenter returns without an error, we show the success message to the user.

Its only when user tries to login to the vsphere web client, the web client fetches the plugin details from vCenter and tries to download the plugin directly from the URL.  This is the point where there may be a problem with the web client accessing the plugin URL, and fail to load & display within the web client.

Solution:

  1. Windows Vcenter Only: Validate that Windows Firewall Settings on Vcenter Server to allow Vsphere Web-Client - http(s) Port is "allowed" .  To check Windows Firewall settings click: Control Panel\All Control Panel Items\Windows Firewall\Allowed Programs and validate a checkbox is checked for WebClient Http/HTTPs port.
  2. Make sure that there aren’t trailing whitespaces when adding the line “allowHttp=true” in the file "webclient.properties" as per the registration procedure.  Remember to restart the web client service after you make changes.
  3. Use FQDN instead of hostname in the URL used while registering the plugin.  Common issues arise if the domain suffix of the web client host is different than that domain suffix of the target HTTP server hosting the plugin.  Using the FQDN avoids this problem.  If prevsiously register, unregister and start over with the FQDN. 
  4. View the web client logs for clues.

Configure the vSphere Web Client to Allow the HTTP Protocol


Applies To


Product(s): vSphere Web Client Plugin
Product Version(s): v1.0.0.6 and earlier

Symptoms


By default, script plug-in URLs must use the HTTPS protocol to work with the vSphere Web Client. If not properly configured, the vSphere web client will reject the Tintri vSphere web client plugin's HTTP URL.

Symptoms include:
  • The vSphere web client plugin installation is successful however the plugin's UI elements and settings are not visible when navigating the vSphere web client.
  • During setup, an error indicates that "allowHttpsTrue" needs to be added to the webclient.properties file. See the screenshot below.

allowHttpsTrue.PNG

Resolution


To configure the vSphere web client to allow the HTTP protocol, add the following line to the webclient.properties file in the vSphere Web Client install directory and restart the Web Client service.

allowHttp=true

The location of this file depends on the operating system and vSphere version.

For vCenter Server 5.x
Windows 2003
%ALLUSERSPROFILE%Application Data\VMware\vSphere Web Client
Windows 2008/2012
%ALLUSERSPROFILE%\VMware\vSphere Web Client
vCenter Server Appliance
/var/lib/vmware/vsphere-client
For vCenter Server 6.x
Windows 2008/2012
%ALLUSERSPROFILE%\VMware\vCenterServer\cfg\vsphere-client
vCenter Server Appliance
/etc/vmware/vsphere-client/​


После этого рестартуем сервис Web Client(vsphere-client).

/etc/init.d/vsphere-client restart

vCenter Server Appliance 5.x Service Description and Service Name correlation list
Service DescriptionService Name
VMware VirtualCenter Server Servicevmware-vpxd
Embedded vPostgres Database servicevmware-vpostgres
VMware Tools Servicevmware-tools-services
VMware vSphere Profile-Driven Storage Servicevmware-sps
VMware vCenter Inventory Servicevmware-inventoryservice
VMware vSphere Network Dump Collector servicevmware-netdumper
VMware vSphere Log Browservmware-logbrowser
VMware vSphere Auto Deploy servicevmware-rbd-watchdog
VMware vSphere Web Clientvsphere-client
[For vSphere 5.1 Only] vCenter Single Sign-On 5.1vmware-sso


[For vSphere 5.5 Only] vCenter Single Sign-On 5.5 -
VMware Directory Service
vmdird
[For vSphere 5.5 Only] vCenter Single Sign-On 5.5 -
VMware Certificate Service
vmcad
[For vSphere 5.5 Only] vCenter Single Sign-On 5.5 -
VMware Secure Token Service
vmware-stsd
[For vSphere 5.5 Only] vCenter Single Sign-On 5.5 -
VMware Kdc Service
vmkdcd
[For vSphere 5.5 Only] vCenter Single Sign-On 5.5 -
VMware Identity Management Service
vmware-sts-idmd

вторник, 19 апреля 2016 г.

What Is an Adjacency?

What Is an Adjacency?

CEF describes a very high speed switching mechanism that a router uses to forward packets from the inbound to the outbound interface. CEF uses two sets of data structures or tables, which it stores in router memory:
  • Forwarding Information Base (FIB) leavingcisco.com—Taken from the common International Organization for Standardization (ISO) usage, an FIB describes a database of information used to make forwarding decisions. It is conceptually similar to a routing table or route-cache, although it is very different from a routing table in implementation.
  • Adjacency table —Two nodes in the network are considered adjacent if they can reach each other using a single hop across a link layer. For example, when a packet arrives at one of the router's interfaces, the router strips off the data-link layer framing and passes the enclosed packet to the network layer. At the network layer, the destination address of the packet is examined. If the destination address is not an address of the router's interface or the all hosts broadcast address, then the packet must be routed.
    At a minimum, each route entry in the database must contain two items:
    • Destination address—This is the address of the network the router can reach. The router may have more than one route to the same address.
    • Pointer to the destination—This pointer indicates that the destination network is directly connected to the router, or it indicates the address of another router on a directly-connected network towards the destination. That router, which is one hop closer to the destination, is the next-hop router. An adjacency represents the pointer to the destination.

вторник, 5 апреля 2016 г.

Common Routing Problem with OSPF Forwarding Address

OSPF Forwarding Address

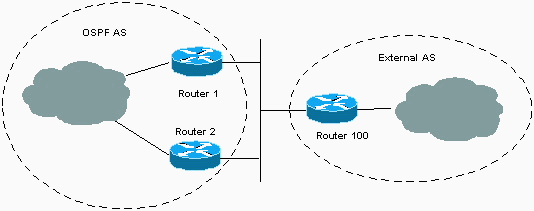
Концепция OSPF forwarding address была введена для предотвращения лишнего хопа, в процессе маршрутизации трафика во внешнюю автономную систему (external autonomous system), как это отражено на рисунке ниже.
10a.gif
На рисунке мы видим 2 маршрутизатора в OSPF домене, которые подключены к внешнему домену. Тем не менее, только Router 1 обменивается маршрутной информацией с Router 100. Router 1 перераспределяет (redistributes) полученную маршрутную информацию от Router 100 в OSPF домен.
При этом, Router 1 становится next hop (или forwarding address) для маршрутов которые были перераспределены (redistribute) в OSPF domain. Когда Router 2 получает пакет с внутреннего OSPF домена, направленный на external domain, он отправляет пакет на Router 1. Router 1 потом отправляет его на Router 100.

Концепция forwarding address позволяет избежать ситуации с дополнительным хопом, потому что становится возможным Router 1 назначить IP адрес другого роутера в качестве forwarding address. в нашем рисунке, Router 1 может назначить Router 100 в качестве  forwarding address для внешних маршрутов которые  Router 1 перераспределяет в OSPF домен. Когда Router 2 получает пакет с OSPF домена предназначенный для адреса во внешней AS, он отправляет его на Router 100, вместо Router 1. Как результат - мы избавились от лишнего и ненужного промежуточного узла на пути прохождения трафика.
Значение forwarding address устанавливается autonomous system boundary router (ASBR) (Router 1 на нашей картинке) и может быть как 0.0.0.0 так и non-zero. Значение 0.0.0.0  говорит о том, что originating router (the ASBR) является next hop-ом.. Forwarding address определяется по следующим критериям:

How Type 5 LSA Forwarding Addresses Can Affect Path Selection

Forwarding Addresses Not Set for Both LSAs

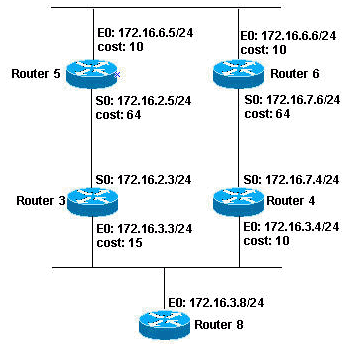
The topology shown below is used to demonstrate how the forwarding address in an OSPF type 5 LSA can affect the path selection of the type 5 LSA.
type5_lsa_01.gif
In the diagram above, all routers, other than Router 8, are running OSPF in area 0. For the purpose of this document, the configurations of Router 3 and Router 4 are most important because they are the autonomous system boundary router (ASBRs) generating the type 5 LSAs. As shown below, Router 3 and Router 4 have a static route to network 200.200.200.0 255.255.255.0, which is being redistributed into OSPF.

понедельник, 4 апреля 2016 г.

Unifi AP Password Restore

Use MongoDB to retrieve username / password.
    1. Open the UniFi controller program, or make sure the service is running. 
    2. If on Linux, skip to step 4. If on Mac or Windows, please download the mongoDB zip or tgz file by going to THIS site. Once at the site it should automatically detect the proper operating system. Make sure Previous Releases is selected choose a version from 2.2 from the drop down menu on the left.
    3. Extract the contents of the container to your desired location.
    4. Open Terminal (Mac/Linux) or Command Prompt (Windows) and change directory to the /bin folder found within the extracted folder. Do note that Linux users can run the command from any folder, only Mac and Windows users need to change to the /bin folder.

Cisco ASA. NAT.

Main Differences Between Network Object NAT and Twice NAT
The main differences between these two NAT types are:
  •  How you define the real address. 
         – Network object NAT— You define NAT as a parameter for a network object. A network object names an IP host, range, or subnet so you can then use the object in configuration instead of the actual IP addresses. The network object IP address serves as the real address. This method lets you easily add NAT to network objects that might already be used in other parts of your configuration.
           – Twice NAT— You identify a network object or network object group for both the real and mapped addresses. In this case, NAT is not a parameter of the network object; the network object or group is a parameter of the NAT configuration. The ability to use a network object group for the real address means that twice NAT is more scalable.
  •  How source and destination NAT is implemented.